
We show you how to take on the ultimate DIY job – painting a room.
Painting an entire room? Like, the whole thing? We show you how to accomplish the ultimate DIY job.
First things first: if you haven’t been doing your squats and push-ups, come back to this in a couple of months. Painting a room involves a lot of stretching, climbing, and crouching. A lot.
Measure Your Room
Whip that tape measure out! Most paint companies have calculators on their websites that tell you how much paint you will need for your room, though this service is also available at many actual stores. The amount of paint you need also depends on the colour of your original wall; let your paint guy know whether you’re painting dark over light or light over dark.
Assemble Your Tools
 You will need:
- Paint
- Thinner (not necessary for ready-mixed paint)
- Primer (not necessary for ready-mixed paint)
- Paint roller with extension handle
- Straight-edged brush
- Angled brush
- Paint tray
- Paint multi-tool (to clean your roller, scrape and spread paint, and clean cracks)
- Painter’s tape
- Step ladder
- Newspaper or tarp
- Rags
You will also need the following to prep your walls:
- Pole sander with sand paper
- Scraper
- Caulk or sealant
- Putty knife
- Sponge or wash cloth, soap, and warm water
Prep your walls

SOURCE: sander-review.com
Here’s an easy 5-step guide!
- Scrape: Use your scraper to remove bumps, drips, and old, flaky paint.
- Patch: Fill old holes and gaps with caulk or any other patching compound using a putty knife.
- Clean: Wipe your walls with detergent and warm water to remove grease, dirt, and oil.
- Prime: This is especially necessary on patched up areas, but primer is also great for new or dark walls – it fills in the ‘pores’ in your wall and creates a smooth, even base for your new paint. Skip if you’ve got ready-mixed paint.
- Sand: Using side to side sweeping movements, sand your wall from top to bottom. This ‘scuffs’ up your old paint and prepares it for its fresh coat.
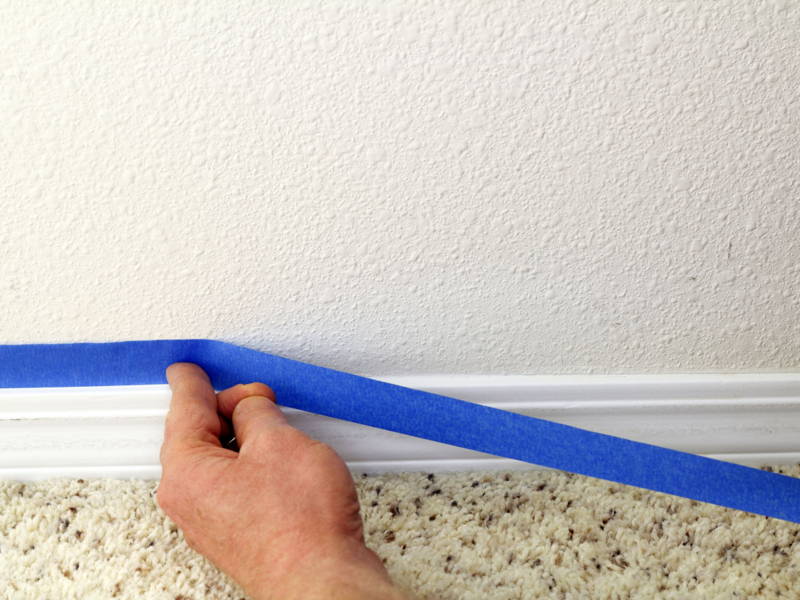
Prep Your Space
Move all your furniture out of the way and cover your floors with tarp or old newspapers to catch splatters. Apply your painter’s tape along the edge of areas that will not be painted – the floor, windows, electrical outlets, etc. Run your putty knife over it to make sure no paint seeps underneath.
 Make sure your area is properly ventilated so that your walls (and you!) have a constant supply of fresh air. You should also keep essentials like drinks, cell phones, and a pair of slippers close by so that you don’t trek paint through your house.
Paint
We’re finally there! A good guide is to start with the ceiling, then walls, and then windows and doors.
Step 1: Cutting In

SOURCE: erinspain.com
Start your job by ‘cutting in’. This means painting around obstructions or different surfaces – basically, you’re outlining your walls. To start, dip your angled brush one-third of the way into your paint. Squeeze excess paint off the bristles by lightly pulling the brush against the edge of the can.
Then run your brush in a line about an inch from the edge. Holding the brush like a pencil, line the pointed angle along the edge and paint with smooth strokes to avoid streaking. Feather out drips and mistakes as you go along.
Step 2: Rolling
It’s time to rock and roll! Dampen your new roller with a wet cloth. Once you’ve dipped it in paint, run it along the grated area of your paint tray to even out the paint.

SOURCE: charterhouseinteriors.com
Concentrating on 1 square meter at a time, roll the paint onto your walls in a zig zag pattern starting near the top. Then use overlapping strokes from top to bottom to spread the paint evenly until your wall is covered; this also helps even out drips and overly thick areas.
If you need to paint another coat, wait until your first coat dries. Sand your walls between coats for a better finish.
Step 3: Windows, Doors, and Trim
You can start by cutting in; then paint broader areas with a wide, straight-edged brush using the same smooth, measured strokes. For cleaner edges, wait till your walls dry and apply painter’s tape again – this time on the opposite side.
Post-Painting
Remove your tarp, newspapers, and painter’s tape. You can toss your cheap rollers, or use your multi-tool to scrape off paint from your roller cover.

SOURCE: wikihow.com
To clean, soak your brush bristles in water or paint solvent for a while. Then rinse with warm water; you can use a comb or toothbrush to remove any stubborn paint that’s left. Pat dry with a clean cloth before massaging the bristles back into their original shape and hanging them up to dry. Store brushes in their original packaging or wrap in plastic.
And that’s it! You’ve painted a room!
We show you how to take on the ultimate DIY job – painting a room.
-
 Atap DesignVoyage 2024: A Day of Design Discovery and Connection
-
 6 Designers Share Lessons They Learned from Their Mothers
-
 The Art of Personalisation: How King Living Creates Unique Furniture with Modular Design
-
 Best Condos for Young Professionals in Klang Valley
-
 Give Your Home A Designer Touch with Rugsea


